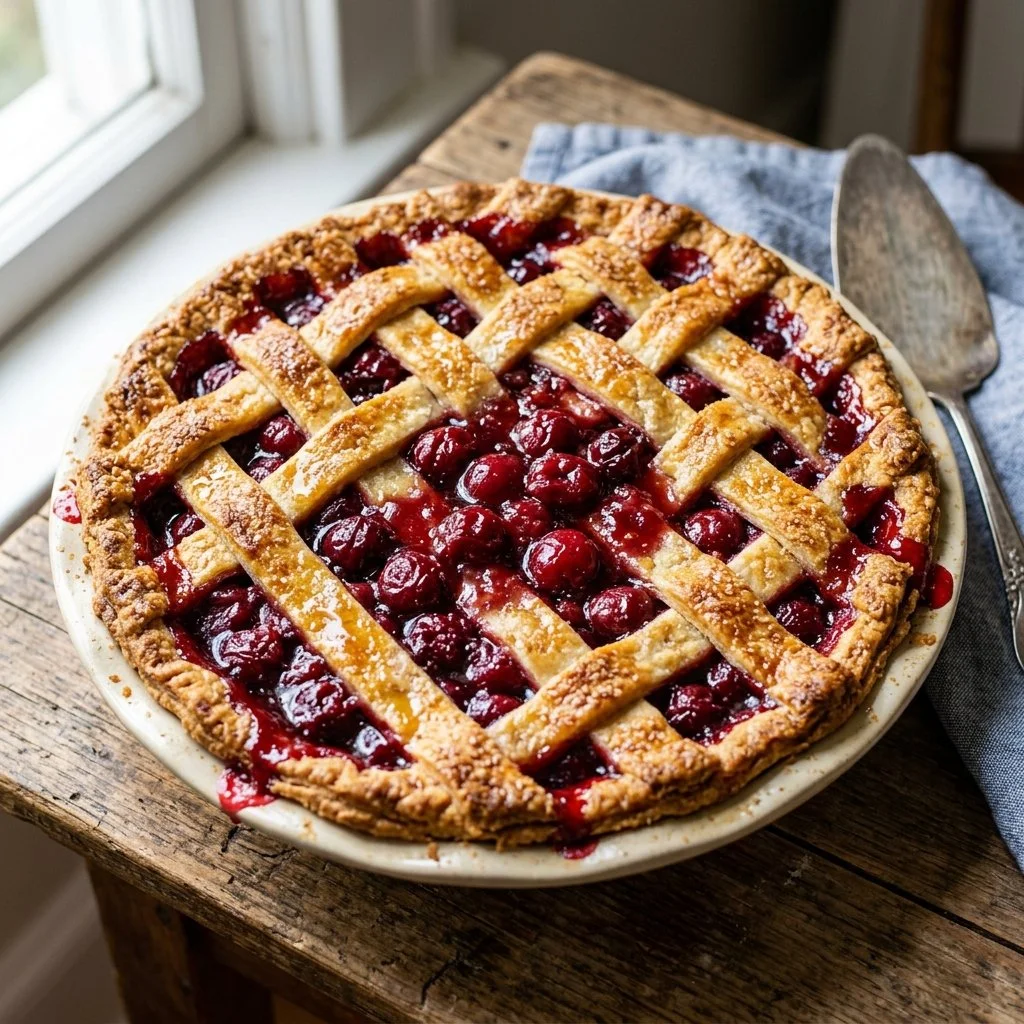
There’s something incredibly nostalgic about a cherry pie, isn’t there? For me, it brings back memories of summer afternoons spent in my grandmother’s kitchen, where the scent of fresh fruit melding with buttery crust filled the air. As a child, I was enlisted every summer to help pit cherries. Little did I know, those pitted treasures would transform into warm, gooey pie filling, served hot with a scoop of vanilla ice cream melting into a sweet, cherry goodness. Today, I want to share this beloved recipe with you, so you too can create sweet memories and savor every bite of this delightful dessert.
Recipe Timing
- Prep Duration: 20 minutes
- Active Cooking: 35 minutes
- Total Duration: 55 minutes
- Portion Size: Serves 8
- Complexity: Simple
Nutritional Recipe
- Calories per portion: Approx. 290
- Protein: 2g per serving
- Carbs: 45g per serving
- Fats: 11g per serving
- Fiber: 2g per serving
- Sugars: 20g per serving
- Sodium: 210mg per serving
Why You’ll Love This Cherry Pie
This cherry pie is more than just a dessert; it’s a celebration of sweet-tart flavors and flaky crust that evoke warmth and comfort. Each slice offers a burst of juicy cherries complemented by just the right amount of sweetness, thanks to the sugar and lemon juice that bring a bright note to the filling. Plus, the buttery aroma that wafts through your kitchen while it’s baking will make your home feel welcoming and joyful.
The Complete Cooking Journey
Baking this cherry pie is a straightforward process that yields impressive results. From mixing the filling to watching it bubble and brown in the oven, every step feels like an accomplishment. The beauty of this recipe is its simplicity. You don’t have to be a seasoned baker to bring this gorgeous pie to life!
Ingredients:
- 2 cups fresh or frozen cherries
- 1 cup sugar
- 2 tablespoons cornstarch
- 1 tablespoon lemon juice
- 1 teaspoon vanilla extract
- 1 pie crust (store-bought or homemade)
- 1 tablespoon butter (optional)
Method:
Step 1: Preheat the Oven
Preheat the oven to 425°F (220°C). This helps to ensure that your pie crust bakes evenly and achieves that perfect golden brown color.
Step 2: Prepare the Cherry Filling
In a large bowl, combine the cherries, sugar, cornstarch, lemon juice, and vanilla extract. This combination is magic; it creates a balanced filling that harmonizes the sweet and tart elements beautifully.
Step 3: Let it Rest
Stir the mixture until well mixed and let it sit for about 10 minutes. This resting time allows the juicy goodness from the cherries to meld with the sugar and cornstarch, developing its flavors.
Step 4: Assemble the Pie
Place the pie crust in a pie dish and fill it with the cherry mixture. Ensure that you distribute the cherries evenly for a delightful bite in every piece.
Step 5: Optional Butter Dotting
Dot with butter if desired. This step is not necessary, but adding butter atop the filling can elevate the flavor and provide that extra richness.
Step 6: Create the Top Crust
Cover with another pie crust or create a lattice top. This is where you can get creative! The lattice top not only looks beautiful but also allows steam to escape while baking.
Step 7: Bake to Perfection
Bake for 30-35 minutes or until the crust is golden brown. You’ll want to keep a close eye on it during the last few minutes, ensuring that it turns the perfect shade of delicious.
Step 8: Cooling Time
Let the pie cool before serving. Yes, it’s tempting to dig right in, but allowing it to cool will let the filling set perfectly, making for beautiful slices.
Serving Suggestions & Pairings
Serve slices of this delectable cherry pie with a scoop of vanilla ice cream or a dollop of whipped cream for a classic treat. A drizzle of chocolate sauce can add a delightful twist or serve it alongside a cup of freshly brewed coffee or tea for a warm afternoon pleasure.
Storage & Leftovers Guide
Leftover cherry pie can be stored in the refrigerator for 3-4 days. Keep it covered to maintain its freshness. If you want to enjoy it after more than four days, slice individual pieces and freeze them, which can last for up to 6 months. Just pop it in the oven to warm when you’re ready to indulge!
Kitchen Wisdom & Success Tips
- Ensure the cherries are pitted well for a smooth filling texture.
- If using frozen cherries, there’s no need to thaw them; just add a bit more cornstarch to the filling to accommodate the extra moisture.
- For a golden crust, you can brush the top with a bit of egg wash before baking.
- If you find your filling is too runny, don’t fret! A bit more cornstarch can help thicken it up.
Flavor Variations & Adaptations
Feel free to experiment! Add a pinch of cinnamon or almond extract for a warm, nutty flavor or mix in some fresh berries for a delightful twist. You can also switch up the crust with graham cracker for a change in texture.
Reader Questions & Solutions
-
Can I use other fruits for this recipe?
Absolutely! This recipe is versatile, and other berries like blueberries, raspberries, or even peaches work wonderfully. -
Why did my crust turn soggy?
Ensure that your filling isn’t too watery before assembling the pie. Using cornstarch helps, as does pre-baking the crust for a few minutes. -
How long should I let the pie cool?
Aim for at least 1 hour before slicing to allow the filling to set properly. -
Can I use a gluten-free crust?
Yes! There are many excellent gluten-free pie crusts available, or you can make your own from almond or oat flour. -
What’s the best way to reheat leftover pie?
Reheat in the oven at 350°F (175°C) for about 10-15 minutes for the best results instead of the microwave.
Wrapping Up
This cherry pie is not just a recipe; it’s an experience that can add sweetness to your family gatherings or quiet evenings at home. As you savor each bite, you’ll be creating cherished moments that will last a lifetime. So, roll up your sleeves, get those cherries ready, and bake your way to happiness with this delightful cherry pie!
PrintClassic Cherry Pie
A nostalgic cherry pie recipe that brings together a sweet-tart filling and a flaky crust, evoking warm summer memories.
- Prep Time: 20 minutes
- Cook Time: 35 minutes
- Total Time: 55 minutes
- Yield: 8 servings 1x
- Category: Dessert
- Method: Baking
- Cuisine: American
- Diet: Vegetarian
Ingredients
- 2 cups fresh or frozen cherries
- 1 cup sugar
- 2 tablespoons cornstarch
- 1 tablespoon lemon juice
- 1 teaspoon vanilla extract
- 1 pie crust (store-bought or homemade)
- 1 tablespoon butter (optional)
Instructions
- Preheat the oven to 425°F (220°C).
- Combine the cherries, sugar, cornstarch, lemon juice, and vanilla extract in a large bowl.
- Let the mixture sit for about 10 minutes.
- Place the pie crust in a pie dish and fill it with the cherry mixture.
- Dot with butter if desired.
- Cover with another pie crust or create a lattice top.
- Bake for 30-35 minutes or until the crust is golden brown.
- Let the pie cool before serving.
Notes
Serve with vanilla ice cream or whipped cream. Store leftovers covered in the refrigerator for 3-4 days.
Nutrition
- Serving Size: 1 slice
- Calories: 290
- Sugar: 20g
- Sodium: 210mg
- Fat: 11g
- Saturated Fat: 5g
- Unsaturated Fat: 4g
- Trans Fat: 0g
- Carbohydrates: 45g
- Fiber: 2g
- Protein: 2g
- Cholesterol: 0mg